Saturday, April 28, 2012

Roses, Roses, Roses

Last year I was running into K-mart and stopped to take a look at the sidewalk clearance racks.  I found these two pink v-neck t-shirts for $2 each.  It took me a while to figure out what I wanted to do with them, but I am so glad I took my time because I LOVE the end result--definitely worth the wait!

I took one of the shirts and cut the sleeves off. 


Then, following the curve of the sleeve,  I cut strips approximately 1/2 inch wide.


I only cut the strips from one sleeve because I wanted to use the other sleeve for a few circles.

Remember how I like to make circles?  Cut a square, trim the corners then trim around a little more to make a circle.  I cut three circles.

For the next step, I took a circle and a strip of the sleeve fabric.  Put an end of the strip onto the center of the circle and stitched a few stitches (backstitch).  Then, with the needle down, lift the pressure foot and turn the circle about 1/16 of a turn and gently pull the strip to the side and stitch.  Repeat, repeat, repeat.  What?!  That was hard to follow?  Ok, I figured it would be so I made a video tutorial.  Sometimes it is so much easier to just see it done. :)  It's a little long, but you'll get the idea within the first few minutes.  The whole of the video offers advise and tips on making it an easy going project and how to keep going once the first strip ends.


At the end of the video, we are left with this flower.  See, the top right edge of the base circle shows.  It doesn't look too bad, but I felt like there was a little too much there....

So I simply just trimmed it off.


I made three circles (the top circle was the first I made and I pulled the strip fabric as I sewed-- I think it was cute but I really love the more ruffly look of the bottom two, so, don't pull too much!).  I placed the flowers on the shirt where I wanted them.


I pinned them in place on the inside of the shirt.  I then carefully turned the shirt inside-out.


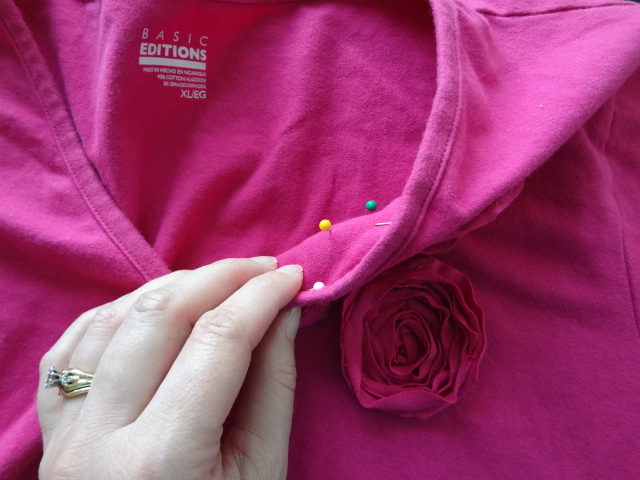
I tacked each flower onto the shirt using approximately 6 stitches around the perimeter and one in the center of each flower.  I didn't want any loose threads so I ran the needle between the layers when going from stitch to stitch, and for extra security I made a knot after each tacking stitch.


I love the way my shirt it turned out.


Oh, and for those who may not have a use for roses in their life, if made in a different color or variety of colors, these would make fun monster parts or planets.  Use your imagination. :)

Thanks for stopping by.
I'm linking up to CRAFTY COUSINS!

Saturday, April 21, 2012

Flippin' Fast Flower Tutorial

In my last post I mentioned that I made flowers for the girls' hair to match their Easter dresses.  I threw together a tutorial and it was so fast that I got it all done in less than 10 minutes (including pictures).

Get ready.

Get set.

Go...!

You will need to cut five circles out of your choice of fabric.  The circles need to graduate in size from largest (about 3-inches diameter) to smallest (1-inch diameter).  The beauty of this flower is that it doesn't have to be perfect.

An easy way to cut circles freehand is to first cut a square.  Then cut the four corners off like this:


Once the corners are cut off, it's easy to just trim around the rest of the edges to make a circle:


Moving along.... Five circles (notice the A-OK imperfect shapes), needle & thread and a little white button.


Now, to add a little visual interest to the flower, I like to *flip* the second and fouth circles over, revealing the wrong side of the fabric.


Now, stack those little circles from largest to smallest and top it off with a cute little button.


And sew that button on.


I also like to grab the edges of the circles to fray them a bit.


Last step, attach the flower to your favorite hair clip using your favorite method and you're good to go!

That's it!
Flippin' fast, right?!

I'm linking up to Crafty Cousins What I Wore Sunday linky party!


Saturday, April 14, 2012

Lulu Dress by CINO

I picked up some cute fabrics a few months ago with the hope of making skirts for my girls.  When Easter Eve rolled around (a Saturday, by the way), the skirts didn't feel like the right project.  With it being a Saturday and me needing something for the girls for Easter, I, once again, ran to my favorite place for little girl dress tutorials:  http://www.craftinessisnotoptional.com/

I searched Jess's Tutorial page and found the Lulu Dress.  I used all woven cottons on mine so I switched things up a bit.  Because the cotton wouldn't stretch like the knit, I made the button closure on the backs of the dresses.

 What are they peeking at?

 Sugar, sugar sugar!

Rather than doing the elastic ruched sleeves, I just made simple little cap sleeves.  I made some little flowers for their hair but didn't get any pictures.  I might have to share them next week....


I think the pink dress was a perfect fit.  The aqua dress turned out a little short in the bodice.  She may not get much use out of it before it's too small but the good news for her is that she'll grow into the pink one.

For those keeping track, I finished at 5:00 a.m. Easter morning.  I really have to stop doing that!!!

UPDATE: Go here for the Flippin' Fast Flower Tutorial!

I'm linking up to Crafty Cousins!

Sunday, April 8, 2012

Little Dresses for Africa

This week I needed a fairly easy project so I decided to make some pillowcase dresses for Little Dresses for Africa.  I have been wanting to make a pillowcase dress for years and finally felt a prompting to do it now.


My hope was to make 3 or 4 dresses so I went to the fabric store looking for a good deal on some 100% cotton fabric that was sturdy and cute.  My friend found this fun yellow fabric with the pink flowers and green dots.  It was marked at just under $2.00 a yard but when it was cut, the price came up as $0.67 a yard.  With the two yards that were on the bolt, I made a small toddler size dress and an extra-large for a teenage girl.


I used some scraps from a yellow sheet to add pockets.  I'm going to slip a new pair of underwear in each pocket to send along with the dresses.  For these precious little girls, wearing underwear can make a big difference in their lives.

This is my little one, cheesing it up for the camera!

I'm linking up to Crafty Cousins!